Sunday, November 3, 2013

Christmas Crack - AKA saltine toffee

Gotta love me some Christmas Crack

Christmas Crack is so delish!  And, seriously so easy to make.  It's probably called crack because it is so additive.


Ingredients:
Saltine Crackers
1 Cup of Butter (2 Sticks)
1 Cup Brown Sugar
Chocolate Chips, I like to use the mini ones

It is so easy to make

Your oven should be pre-heated to 400 degrees.

Step One:
Line the bottom of a cookie sheet or baking pan with the saltine crackers in one layer.  I like to put foil or wax paper on the bottom, makes it easier to get out.  Make sure to fill the entire bottom, even if that means you have to break some of the crackers.


Step Two:
Melt together the butter and brown sugar.  Let it come to a boil, lower temp and simmer for about 2 minutes


Step Three:
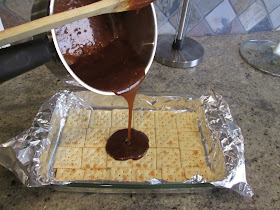
Pour the butter/sugar mixture over the crackers.


Make sure you coat all the crackers, you can use a spoon to spread evenly


Step Four:
Bake in the oven for 5-6 minutes at 400 degrees


Step Five:
Once out of the oven, spread chocolate chips over the entire dish


Step Six:
After a few minutes, spread the chocolate around, coating the entire pan


DONE
  
I like to throw it in the freezer to cool and set.  But, the chocolate will harden if just on the counter. Once totally cool, just break into pieces and enjoy.  Beware:  you can't just have one piece.


Monday, October 21, 2013

Dolly Donations

My Company Giggle Worm will be creating some dollys for Operation Christmas Child - and Dolly Donations

Here is my first of hopefully many dolls that I can send over to Africa for a child to love.  Every child deserves a little friend to cuddle.


Tuesday, October 8, 2013

Day out with Thomas

I was a guest blogger over at Momma Lews Blog, writing about my experience with the Day out with Thomas in Phillipsburg, NJ.

Here is a copy of my review from her blog.  You should check her out, she does lots of reviews and lots of give-a-ways!


The Day out with Thomas event, which was run on the Delaware River Railroad in Phillipburg, NJ, was a great afternoon for our little Thomas the Tank fans. The look on my 2 year old’s face was just priceless.
We had tickets for the 1pm train ride, and as recommended, we arrived about an hour before. While there was no parking actually ON site, there was plenty of free parking located within a few minutes walk from the station. Don’t be fooled by the lots that charge $10 for parking, we were able to find a free spot very quickly. The walk to the station is easy - although there are some hills.
Upon arriving at the station, we were pleasantly surprised to find 2 bounce houses, which are included in the ticket price. The bounce houses, a gift shop area, and also a toy train display were all located on the upper area of the station. We walked down a small hill to the train area (lower area) and there was Thomas! The kids got so excited to see him for the first time as we rounded the bend to the lower area.


Thomas fans, young and old, will love the scenic open-air train ride, pulled by non other than Thomas the Tank! Don’t forget to get a family photo before you board. There is no air conditioning on the train cars, however, there are two fans at the front and rear of each car, and of course you may open a window. The train ride departed on time and we were able to enjoy the scenic route along the Delaware River. They even had songs from popular Thomas shows being played for the entire trip. I was fun to sing along with the crowd.


After the train ride is when the extra fun started! Thomas fans could spend a few hours enjoying all the extras that are included in the ticket price. We were entertained by a juggler, then the kids went over the the activity tent, where they did spin art, stamp art, got a temporary tattoo, colored Thomas the Tank pages, played on one of the 3 train tables, created tracks using one of the 3 mega blocks stations, and visited the animals in the small petting zoo. My kids could have stayed all day.


When my kids needed a pit stop, it was easy to find a port-a-potty. There were 10 located on the upper area, and about the same on the lower area.


Need a quick snack? There was food available in both the upper and lower areas, with things like ice cream, slushies, lemonade, corndogs, hot dogs, hamburgers, grilled cheese, etc. Very typical food for this type of event. We were able to pack a picnic lunch and ate in the shade where there was an abundance of picnic tables.


So much was included in our ticket price, the kids did not want to leave. We decided to purchase the souvenir photo of Thomas and our family. Each photo item is $17.99 or two items for $22. So, we went with the magnet photo and a key-chain  The photos were ready within minutes. We will put it on the fridge and will be a great reminder of the awesome day we had.
So, Thomas the Tank fan - get ready for a great day!


DIY Princess Castle Cake

The girls LOVE princesses and they wanted a princess castle cake for their birthday.  I am no master baker - but when they ask for a castle cake, they shall get a castle cake LOL.

Turns out my mom had the Wilton Enchanted Castle Cake Pan, yay.  This is a molded cake pan, that if all goes well you just bake it and decorate it like a castle.  Easy Peasy.

Here is my semi tutorial.  I kinda start the photos after the cake was baked - lol.

What I needed:
ONE cake mix box (plus all ingrediants on the box)
2 Tubs of frosting
1 Tube of gel frosting
Food Color
Decorator Bag + tips
Tooth picks


Step 1:  Mix up your favorite cake recipe.  And, if you are like me, that means a cake mix box.  You only need ONE box for this cake.  Just make it according to the directions.  Make sure you really really spray your castle pan with cooking spray, and for good measure I dusted with some flour.

Step 2: Bake the Cake.  Of course there is no time listed on your box for a formed pan (lol), mine took 34 minutes to bake.  After you remove it from the oven, keep it in the pan for about 10 minutes to cool.

Step 3: PRAY that the cake comes out in one piece.  After praying and hoping that it comes out, flip it onto a cooling rack and let it cool for many many hours - I cooled it for about 8 hours.  Maybe even more.

Tada

Step 4: Transfer onto your serving plate.  I used a cutting board covered in foil.  It was nice and flat and served the purpose.  Use white frosting to cover the sides of the cake and all the void "background" spots of the cake.  You can kinda see it here, the space between the towers, and all along the sides.


Step 5: Outline the castle.  This is where I used the tube of gel.  I picked a color that would contrast the rest of my colors.  I used get, but you could use regular frosting using a decorator tip.

Step 6: Tint your frosting and fill in the roofs.  This is where I probably should tell you that you will use your decorator bag and your fancy tips to create little *stars* of frosting to fill in the spaces and it will look oh so pretty.  Yeah, that might have worked if I used a super stiff buttercream, or even added some powered sugar to my store bought tub o' frosting.  But, honestly - I was trying not to stress over this.  So, when my stars turned into blobs, I just went with it.  I did use the decorator bag and the tooth picks to fill in the spaces, and honestly I think it looks great.  No stress.

Step 7:  Tint additional frosting and fill in the rest of the cake using the decorator bag and the tooth picks to get in the small spaces.

TADA - Princess Castle Cake


Craft Fair Set Up

I have searched for Craft Fair Set ups, so I figured I would post some pics of a recent fair that I did.  This was a unique fair since 100% of the items were donated, and then 100% of the proceeds at benefit a child who was recently paralyzed.  So, there was a lot of variety on the table.

Our #1 seller was double fishtail rainbow loom bracelets, of all things LOL.

Here are a few pics of our set up - oh, and if you would like more info on Yesenia Parker (the girl who benefited from the sale), you can check out her info page HERE.


Cleaning a Microfiber Couch

When we bought our couches, we didn't have kids yet (well, we had Colin - but he was 11).  We heard that micro fiber was the way to go since it really didn't stain.  Well, when I find that person that said that - remind me to smack them upside the head.

Since having the little kids, our beige microfiber couches are gross!  Disgusting.  The worst is that if we do spill something, and then wipe it even with a baby wipe - we are left with a water stain.  It really looks so so bad.

We can't afford new couches right now, so I needed to find a way to clean them.  Off to pinterest I go lol.

I found a tutorial using rubbing alcohol.  You basically put rubbing alcohol in a spray bottle and spray on to the couch and then just rub like crazy to clean the couch.  The rubbing alcohol evaporates differently than water so it does not leave the water stain.

Well, I must say - my couches look awesome!

Here is a little before and after.


Monday, July 8, 2013

Making a mid-year resolution

I feel like this blog has taken a back seat to the rest of my life.  That is not a bad thing - but I always loved writing on the blog.  So, I am making a mid-year resolution to write on this blog more often!

It will still have things about family, crafts, tutorials, and our adventures.

Stay tuned :)